Essential Steps in a Professional Roof Installation Process
The roof over your head does more than just protect you from the weather; it’s a complex structure that plays a critical role in the overall durability, energy efficiency, and aesthetic appeal of your home. Professional roof installation is vitally important, as even minor mistakes can lead to significant problems, including leaks, structural damage, and costly repairs down the line. Today, we’ll outline the steps of a professional roof installation process. From selecting the right materials to the final inspection, we’ll guide you through the necessary steps to achieve a robust and reliable roofing system. Understanding this process can help you make informed decisions and work effectively with roofing professionals to ensure a smooth and successful roof installation.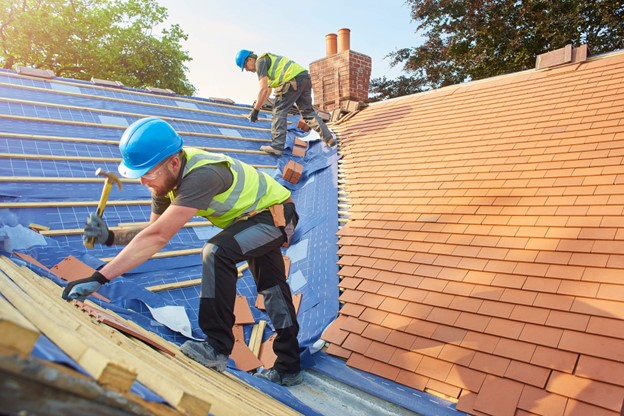
Step 1: Choosing the Right Materials
The first and perhaps most crucial step in the roof installation process is selecting the right materials. The choice of roofing materials impacts not only the appearance of your home but also its protection against the elements, its insulation properties, and even its value. Materials vary widely in terms of durability, weight, aesthetics, and cost, making it essential to consider the specific needs of your home and the climate in which you live. Key material considerations include:
- Climate: Materials should be chosen based on their ability to withstand the local weather conditions, whether it’s extreme heat, cold, or susceptibility to storms and heavy rainfall.
- Weight: The structural integrity of your home will determine the weight of the roofing materials it can support. Consulting with a structural engineer or an experienced roofing contractor can help you make an informed choice.
- Aesthetic Appeal: The material should complement your home’s architectural style and exterior color scheme. It’s also worth considering the material’s color and texture, as these can influence the visual appeal and, potentially, the resale value of your home.
- Cost-Effectiveness: While it’s important to consider the upfront cost of roofing materials, evaluating their lifespan, maintenance requirements, and energy efficiency benefits can help you understand their long-term value.
Advice on Working with Roofing Professionals:
When selecting materials, it’s advisable to work closely with roofing professionals who can provide insights into the advantages and limitations of each material. They can also help you navigate the options within your budget while ensuring that your material choice meets local building codes and insurance requirements.
Step 2: Removal of the Old Roofing (if applicable)
Before the new roof can be installed, the old materials must be carefully removed and disposed of, especially in the case of renovations or when significant damage mandates a complete replacement. This step is critical, as it allows for a thorough inspection of the underlying structure and ensures that the new roofing materials have a solid, stable base to adhere to.
Key Considerations for Removal:
- Inspection: Removing the old roofing provides an opportunity to inspect the decking and framing underneath for any signs of water damage, rot, or pest infestation. These issues must be addressed before proceeding with the installation of the new roof.
- Safety and Efficiency: The removal process can be hazardous, involving sharp objects and the risk of falling debris. It’s important that professionals use the proper safety equipment and techniques to prevent injury and property damage.
- Disposal: Old roofing materials need to be disposed of responsibly. Many materials, especially asphalt shingles, can be recycled. A professional roofing contractor will have the knowledge and resources to ensure that disposal complies with local regulations and sustainability practices.
Tips for Homeowners:
- Prepare Your Property: Before the removal process begins, take steps to protect your property. This includes moving vehicles away from the work area, covering landscaping, and securing outdoor furniture to minimize the risk of damage.
- Communicate with Your Contractor: Discuss the removal and disposal plan with your contractor. Ensure they have a clear strategy for keeping the site clean and minimizing disruption to your daily life.
Step 3: Inspecting and Repairing the Roof Deck
Once the old roofing is removed, the roof deck (the structural surface lying beneath the roofing material) is fully exposed, allowing for a detailed inspection. This step is vital to the longevity of your roof, as any undetected damage can lead to major problems down the road.
Importance of Roof Deck Inspection:
- Detecting Damage: Look for signs of water damage, rot, or structural weakness. These issues can compromise the integrity of the roof if not properly addressed.
- Ensuring Proper Installation: A solid, undamaged roof deck is essential for the correct installation of underlayment and roofing materials. Any irregularities in the deck can affect the placement and performance of these materials.
Repairing the Roof Deck:
- Making Repairs: Any damaged sections of the roof deck should be repaired or replaced to provide a stable foundation for the new roof. This may involve replacing entire panels or sections of the decking material.
- Improving Roof Performance: This is also an opportune time to make any adjustments or improvements to the roof structure, such as enhancing ventilation or adding insulation above the ceiling.
Advice for a Smooth Process:
- Stay Informed: Ask your roofing contractor to keep you updated on the condition of the roof deck and to explain any necessary repairs. Understanding the scope of these repairs can help you make informed decisions about the project timeline and budget.
- Quality Materials: Ensure that any materials used for repairs or improvements meet or exceed the original specifications for durability and performance. This is crucial for maintaining the integrity of your roof over time.
Step 4: Installing Underlayment and Waterproofing Barriers
After ensuring the roof deck is in optimal condition, the next step involves installing underlayment and waterproofing barriers. These elements are critical for protecting your home from water infiltration, which can cause damage to the structure and interior of your house.
Underlayment Installation:
- Purpose of Underlayment: It acts as a secondary barrier against water and ice damming, particularly in regions with heavy rain or snow. Underlayment also provides an additional layer of protection against wind-blown debris and UV rays.
- Types of Underlayment: There are several types, including felt paper and synthetic products. Each has its own set of advantages in terms of durability, moisture resistance, and installation ease. Your roofing professional can help you choose the best option for your climate and roofing material.
Waterproofing Barriers:
- Critical Areas: Waterproofing is especially important in areas prone to water accumulation, such as valleys, eaves, and around roof penetrations (like vents and chimneys). These areas are often reinforced with ice and water shields to prevent leaks.
- Installation Techniques: Proper installation is key to ensuring these barriers effectively prevent water intrusion. This includes overlapping methods and sealing around protrusions to create a watertight seal.
Tips for Effective Waterproofing:
- Quality Products: Invest in high-quality underlayment and waterproofing materials that match the longevity and performance level of your chosen roofing material.
- Professional Installation: Ensure that your roofing contractor has experience with the specific types of underlayment and waterproofing methods required for your roofing system. Proper installation techniques are crucial for long-term protection.
Step 5: Installing Roofing Material
With the underlayment and waterproofing barriers in place, the next phase is the installation of the roofing material. This step transforms the appearance of your home and is where the choices made in Step 1 come to fruition.
Installation Process:
- Preparation: Begin with a starter strip at the edge of the roof to ensure a straight line and to prevent wind uplift. The method of preparation varies depending on the roofing material.
- Sequencing: Roofing materials are typically installed from the bottom up, allowing each layer to overlap properly. This technique helps direct water off the roof, preventing infiltration.
- Attention to Detail: Special care must be taken around areas like vents, chimneys, and the ridgeline. Flashing, which is a type of material that diverts water, is installed in these areas to prevent leaks.
Ensuring Quality Installation:
- Inspection: Regular inspections during the installation process can help catch and correct any issues early on, ensuring the roof is installed according to manufacturer specifications and building codes.
- Communication: Maintain open lines of communication with your contractor throughout the installation process. This ensures any concerns are addressed promptly and that the project stays on track.
Step 6: Flashing and Sealing
After the main roofing material is installed, it’s essential to focus on the details that ensure the roof is watertight and durable. Flashing and sealing are critical components that protect the most vulnerable areas of your roof from water infiltration and damage.
Flashing Installation:
- Purpose of Flashing: Flashing is a thin material, typically made of galvanized steel or aluminum, used to direct water away from critical areas of the roof, such as valleys, chimneys, vents, and the junctions where roofing meets a vertical surface like a wall or dormer.
- Installation Points: Careful installation is required around all penetration points and areas prone to accumulating water. The flashing must be installed in a way that complements the water-shedding qualities of the overall roof system.
Sealing Techniques:
- Sealant Application: High-quality sealants are used to fill gaps and seal joints, providing an additional layer of protection against moisture. This is especially important in areas where flashing is applied to ensure a completely watertight seal.
- Regular Maintenance: Over time, sealant and flashing may need to be inspected and replaced or repaired to maintain the roof’s integrity. Homeowners should include these components in their regular roof maintenance checks.
Tips for Ensuring Effectiveness:
- Quality Materials: Choosing high-quality flashing and sealant materials is crucial for long-term protection. These materials should be compatible with the roofing material and designed to withstand the local climate conditions.
- Professional Workmanship: The correct installation of flashing and sealing is nuanced and requires professional expertise. Improper installation can lead to leaks and significant damage, underscoring the importance of hiring experienced roofing professionals.
Step 7: Ventilation and Insulation
Proper ventilation and insulation are key to protecting the roof and interior of your home from temperature-related issues and moisture accumulation, which can lead to mold, mildew, and structural damage.
Roof Ventilation:
- Importance of Ventilation: Adequate ventilation helps maintain an even temperature between the outside air and the attic space, preventing issues like ice damming in winter and excessive heat buildup in summer. This balance helps extend the life of your roofing materials and reduces energy costs.
- Types of Vents: There are various ventilation options, including ridge vents, soffit vents, and gable vents. The best system depends on the design of your roof and attic space. A roofing professional can help design a ventilation system that ensures optimal airflow.
Attic Insulation:
- Role of Insulation: Insulation helps maintain consistent indoor temperatures, reducing the burden on heating and cooling systems. It also minimizes the risk of ice dams by keeping the roof surface at a temperature close to that of the air outside.
- Insulation Levels: It’s important to have the correct amount of insulation for your climate zone. An energy audit or consultation with a roofing or insulation professional can determine if your attic has adequate insulation and recommend improvements if necessary.
Maximizing Efficiency:
- Integrated Approach: Ventilation and insulation should be considered together to create an efficient and effective system. Properly balancing these elements can significantly impact your home’s energy efficiency and the longevity of your roof.
- Regular Inspections: Regular checks are essential to ensure that vents remain clear of obstructions and that insulation remains dry and properly distributed.
Step 8: Cleanup and Final Inspection
The final step in the professional roof installation process involves a thorough cleanup of the work area and a detailed inspection of the newly installed roof to ensure the site is left safe and clean and that the roofing project has been completed to the highest standards.
Cleanup Process:
- Removing Debris: All leftover materials, nails, and debris from the roofing installation are collected and properly disposed of. This step is crucial for the safety of the occupants and the aesthetic appeal of the property.
- Site Safety: The contractor should conduct a final sweep of the area, using magnetic tools to pick up any nails or metal pieces that could pose a hazard to residents and pets.
Final Inspection:
- Quality Assurance: A comprehensive final inspection is conducted by the roofing contractor to ensure that the installation meets all industry standards, manufacturer specifications, and local building codes. This includes checking the proper installation of materials, flashing, and sealing, as well as verifying that ventilation and insulation have been correctly addressed.
- Addressing Concerns: This is also an opportunity for homeowners to address any questions or concerns they may have about the finished project. It’s important to ensure that you are completely satisfied with the work and understand any maintenance or warranty information provided by the roofing contractor.
Tips for a Smooth and Successful Completion:
- Documentation: Ensure you receive written documentation of all work performed, including warranties for materials and labor. This documentation is important for future reference and for maintaining the warranty on your new roof.
- Maintenance Plan: Discuss a maintenance plan with your contractor. Regular maintenance is key to extending the life of your roof and preventing future issues. Your contractor can offer advice on what to look for and when to schedule professional inspections.
Ensuring Satisfaction:
- Walkthrough: If possible, conduct a final walkthrough with the contractor to discuss the work completed and any follow-up steps or recommendations. This is the time to clarify any doubts and ensure that you understand how to care for your new roof.
- Feedback: Providing feedback to your contractor about the project can help improve their services for future clients and allows you to express your satisfaction with the job well done.
The cleanup and final inspection ensure that the project meets all expectations for quality and safety and that the homeowner is fully informed and satisfied with the outcome. A thorough and conscientious approach to this final step sets the stage for a durable, high-performing roof that will protect your home for years to come.
Skabelund Is Your Roofing Installation Partner
If your roof is old or damaged, call Skabelund for a free estimate on a new roof. We are based locally in Nibley, UT, and serve across Cache County, Box Elder County, Weber County, and Davis County. We know that you and your home deserve the best, so we don’t settle for subpar work or materials. Our experts can handle the job, whether you want metal or shingle roofing, a replacement roof, or a roof on new construction. Contact Skabelund Roofing today!